Physical address:
128 City Road, EC1V 2NX, London,UK
If you’ve noticed damp patches on the wall below your shower, or a musty smell that appears even after a thorough clean, there’s a good chance you’re dealing with water leaking behind bathroom tiles regrout or remove tiles — and you’re probably wondering whether you need to rip everything out, or whether a less disruptive fix will actually hold. The honest answer is: it depends, and getting this wrong in either direction costs money. Patch too lightly and you’re back to square one inside six months. Rip out unnecessarily and you’ve spent thousands you didn’t need to. At Fixiz, we work on bathrooms across London every week, and we’ve seen both mistakes made with depressing regularity. This article lays out exactly what’s happening when water gets behind your tiles, which stopgaps genuinely work, which ones make things quietly worse, and how to know when a full rip-out really is the only sensible path.
Why Water Gets Behind Tiles — and Why Grout Alone Won’t Stop It
Most homeowners assume that grout is the waterproof layer in a tiled bathroom. It isn’t — not even close. Standard cementitious grout is porous by nature. It absorbs moisture, it cycles through wet and dry states every time you shower, and over time it cracks, shrinks, and separates from the tile edge. The actual waterproofing in a correctly built bathroom wet zone sits behind the tiles: a tanking membrane, a waterproof board, or a liquid-applied waterproof layer bonded to the substrate. Grout is a filler that bridges the joint between tiles. It contributes to the appearance of a water-resistant surface, but it is not, on its own, a barrier.
So when people ask about water leaking behind bathroom tiles, the first thing we try to establish is where the water is entering. The most common entry points are the grout joints themselves — particularly in areas of high movement like the internal corners where walls meet each other and where the wall meets the tray or bath edge. These corners flex slightly every time someone steps in and out of a shower. Over months and years, that micro-movement opens hairline gaps. Silicone sealant, not grout, should always be used in movement joints, and when that silicone ages, cracks, or was never there in the first place, water finds a route in with very little effort.
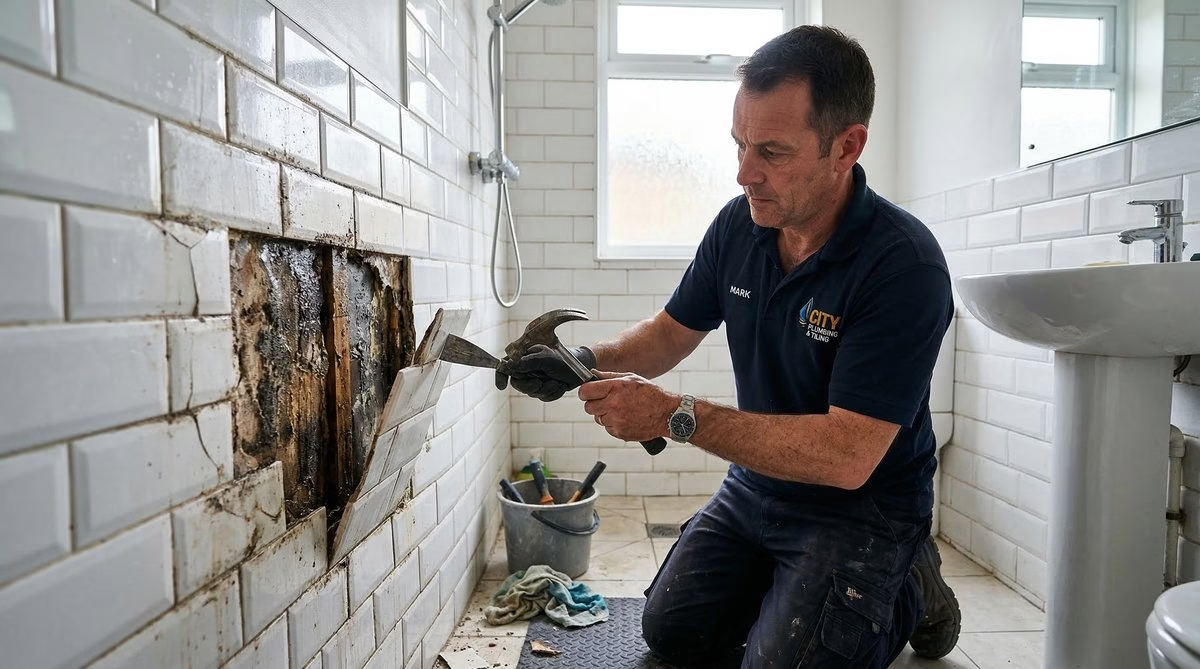
A second common source is the grout line immediately above a bath edge or shower tray rim. Installers sometimes use grout right to the edge — it looks tidy on the day, but this joint is under constant stress. Water sits in it, movement cracks it, and within a year or two there’s a channel running directly to the wall behind. We had a customer in Battersea last year whose beautifully tiled bathroom was only three years old but already had water staining visible on the plasterboard downstairs. When we opened it up, the entire stretch of grout along the bath rim had micro-fractures running its full length — invisible to the eye but acting as a gutter for every shower taken.
The substrate matters enormously here. If the original tiling was done onto standard plasterboard — which happens frequently in older London properties and budget refurbishments — then the board itself absorbs water like a sponge once any joint fails. Once standard plasterboard is saturated, it doesn’t dry out properly, it begins to degrade, and the adhesion between tile and wall starts to fail. You’ll typically notice tiles sounding hollow when tapped, or corners of tiles beginning to lift. At that point you’re not just dealing with a grout problem — you have a substrate problem too. The distinction is critical, because it changes the entire scope of repair.
Temperature and ventilation play a role as well. A poorly ventilated bathroom stays damp between uses, which means grout and silicone never fully dry out. Sustained moisture accelerates the degradation of all joint materials. If your bathroom fan is undersized for the room, positioned poorly, or simply old and underperforming, you’re creating conditions where even a sound installation will deteriorate faster than it should. Bathroom waterproofing is never just about the tiles — it’s about the whole system working together.
Re-Grouting, Resealing, or Cladding Over — Which Stopgaps Actually Work
When water is getting through grout joints, there are three surface-level interventions people typically consider: re-grouting, resealing with a penetrating grout sealer, or cladding over the existing tiles with a new surface. Each has a legitimate place — but each also has a clear set of conditions under which it will fail, and homeowners are rarely told what those conditions are upfront.
Re-grouting can be a sound repair when the damage is genuinely limited to the grout itself — where the substrate is intact, no tiles are loose or hollow, and the issue is simply aged or cracked grout that has lost its integrity. In this scenario, raking out the old grout to a sufficient depth (typically at least 6mm), cleaning the joint thoroughly, and applying a quality epoxy or polymer-modified grout can restore the joint to a watertight condition. The critical variables are depth of removal, cleanliness, and whether the correct grout type is used for the location. Many DIY re-grouts fail because the old grout isn’t raked deep enough, so the new material bonds to a powdery surface and lifts within months.
On a job in Islington earlier this year, a client wanted us to re-grout a shower cubicle that had been leaking. We completed a tap test before agreeing to do it — running a wooden dowel across every tile to listen for hollow spots. Nearly a third of the tiles had lost adhesion behind them. Re-grouting those tiles would have looked right for six months before the same water, now pooling behind hollow tiles, found new routes out. We recommended a partial rip-out: removing only the affected tiles, treating the substrate, re-boarding where necessary, and re-tiling that section. The client saved roughly half the cost of a full refit and got a proper, lasting fix.
Grout sealers are often marketed as a quick waterproofing solution, and they do slow moisture absorption into porous grout. What they cannot do is bridge a cracked or open joint. If water is visibly tracking through — if you can see the grout darkening and moisture reaching behind — a sealer applied over the top will not hold. It may slow visible staining for a season, but the water is still moving behind the tile, still wetting the substrate, and the situation continues to deteriorate invisibly. Sealers are a maintenance product, not a repair product. They belong on sound grout as a way of extending service life, not on failed grout as a substitute for proper remediation.
Cladding over existing tiles — typically with large-format waterproof panels or PVC-backed cladding systems — is probably the most misunderstood option of the three. The marketing around these products emphasises convenience, speed, and the avoidance of a messy rip-out. And in the right circumstances, they can be a genuinely useful solution: where the existing tiles are sound, the adhesion is intact, the substrate is dry and undamaged, and you simply want to refresh the surface or address a cosmetic problem. In that scenario, cladding over can work well and last for many years.
Where it becomes dangerous is when it’s applied over tiles that are already wet or over a substrate that has begun to fail. Sealing a damp wall behind a new surface layer doesn’t dry it out — it traps the moisture in, creating conditions for black mould, accelerated board degradation, and eventual structural damage. We’ve been called to bathrooms where well-intentioned cladding over a leaking wall had been in place for two or three years. By the time the smell became intolerable and the cladding started bubbling at the seams, the plasterboard behind was black through its full depth and in one case the timber noggins in the stud wall had begun to rot. What could have been a straightforward repair became a significant structural job.
Tip: Before committing to any surface-level fix, have someone experienced do a tap test across every tile in the wet zone. Hollow tiles mean lost adhesion — and lost adhesion usually means moisture has already reached the substrate. That changes everything about the right approach.
The Warning Signs That Mean You Can’t Avoid a Rip-Out
There are situations where the conversation about stopgaps simply doesn’t apply — where the extent of the damage means that anything short of removing the tiles and addressing the substrate directly will be a waste of money and time. Knowing these signs early saves significant cost compared to discovering them after an ineffective patch job.
- Hollow or loose tiles: If tiles sound hollow when tapped, or if any tiles have already detached or are visibly lifting at the corners, the adhesive bond has been compromised by water. Re-grouting the surface does nothing for the failed bond beneath.
- Visible mould behind grout lines: A dark line of mould growing along grout joints, particularly at tile edges, indicates that the cavity behind is already damp and supporting growth. Surface mould treatments won’t reach the source.
- Soft or spongy wall surface: If the wall feels yielding when pressed around tiles — particularly on a timber stud partition — the plasterboard or substrate has absorbed enough water to lose structural integrity. It must be replaced, not dried out in situ.
- Damp staining on the other side of the wall: If moisture is tracking through to an adjacent room or through a ceiling below, the volume of water involved is beyond what a surface repair can address. The path through the structure must be interrupted at source.
- Persistent musty smell despite cleaning: A musty or earthy smell that returns quickly after a thorough bathroom clean usually indicates active mould growth inside the wall cavity. This is a health concern as well as a structural one.
- Failed silicone that has been replaced multiple times: If silicone in the corner joints or around the bath or tray has been reapplied two or more times and keeps failing, the underlying movement or moisture problem hasn’t been addressed. Removing and reapplying silicone again is not the answer.
We had a customer in Clapham last year who had re-grouted their shower twice themselves over a five-year period, and had also had the silicone replaced by a local handyman. Each time, the fix held for roughly a year before the same damp patches reappeared below. When we were finally called in and opened the wall, we found that the original installation had used standard plasterboard rather than moisture-resistant board, with no tanking membrane. The board in the corner section was completely saturated and had been for years. Every surface repair had been temporary because the root cause — wrong board, wrong installation — had never been touched. A full rip-out of that section, correctly rebuilt, has now been dry for eighteen months.
The difficult truth about leaking bathroom tiles is that the visible problem — a damp patch, a stained ceiling — is often well behind the actual extent of the moisture damage. Water travels, particularly behind tiles, and it will always find the lowest point and the path of least resistance. By the time you see it, it’s been moving through the structure for longer than the surface evidence suggests.
What a Proper Bathroom Waterproofing Job Looks Like — Tanking, Membranes, and Ventilation
When a full bathroom wet zone is being rebuilt — either as a planned renovation or as the correct response to failed waterproofing — the work that makes the difference happens before a single tile goes on the wall. The tiling itself is almost the last thing done. What precedes it determines whether the job will remain watertight in five years or start to fail in two.
The starting point is the substrate. In most London homes, bathroom walls are either brick, block, or timber stud. On solid masonry, moisture-resistant render or waterproof backing boards can be fixed directly. On timber stud — which is far more common in the terraced and semi-detached housing that makes up the bulk of inner London’s residential stock — the correct substrate is a moisture-resistant board such as Aquapanel, HardieBacker, or equivalent cement-based tile backer board. Standard plasterboard, including so-called “moisture-resistant” variants with the green facing, is not appropriate in a direct-spray shower zone. This is one of the most common errors we see in older refurbishments.
Over the substrate, a waterproofing layer is applied. The two main approaches are a sheet membrane system — where pre-formed waterproof membranes are bonded to the substrate at joints and corners — or a liquid-applied tanking compound, which is painted onto the surface in two or more coats and cures to form a continuous waterproof layer. Both systems, correctly applied, are highly effective. The key word is correctly. A liquid tanking system that has been applied too thin, or that hasn’t been taken far enough up the wall, or where the fabric reinforcement tape hasn’t been embedded at the internal corners, will have weaknesses at exactly the points where water pressure concentrates.
Corner joints deserve particular attention. The internal angle between two walls, and between wall and floor, is where movement is greatest and where water accumulates. Regardless of the waterproofing system used, these corners should be treated with a flexible corner tape or pre-formed corner piece embedded in the waterproofing compound before tiling begins. This creates a flexible bond that can accommodate the micro-movement of the structure without cracking.
Once the waterproofing is cured, tiles are fixed using a suitable adhesive — typically a polymer-modified flexible adhesive in wet zones rather than a rigid powder-and-water mix, which is too brittle for the thermal movement a shower sees daily. Grouting follows, using an epoxy or polymer-modified grout in the wet zone for maximum water resistance. And critically, the movement joints — internal corners, the perimeter joint above the tray or bath — are finished in silicone sealant, not grout. This is the junction that does the most work, and it needs to flex without breaking.
Ventilation is the part of the system that often gets the least attention in a tiling conversation, but it’s integral to long-term performance. A correctly specified extraction fan, sized to the room volume with a run-on timer that operates for fifteen minutes after the bathroom is vacated, reduces the sustained moisture load on every surface in the room. In bathrooms where existing ductwork is inadequate or where the fan discharges into a roof void rather than outside — something we find regularly in converted Victorian terraces across south and east London — this is worth addressing as part of any waterproofing remediation.
Tip: When specifying bathroom ventilation, look for a fan rated to at least 15 litres per second for an average-sized bathroom. If the bathroom opens onto a corridor rather than an external wall, ensure the duct run to the exterior is as short and straight as possible — every bend and every metre of length reduces extraction performance.
How Fixiz Handles Bathroom Leak Repairs — Honest Assessment, No Unnecessary Rip-Outs
Our approach to a customer reporting water behind bathroom tiles starts with a proper diagnosis rather than a default recommendation. We find that a significant proportion of the jobs we’re called to have already had money spent on them — usually a re-grout or a silicone replacement that hasn’t held — which means the customer arrives with a degree of justified scepticism about being told they need to spend more. We think that’s entirely reasonable, and we try to address it by being explicit about what we can and can’t tell them before we open anything up.
The first visit is an assessment. We do a visual inspection of the grout and silicone joints, a tap test across the wet zone tiles, and — where the concern is substrate damage — we look at adjacent spaces: the ceiling below, the room on the other side of a stud wall, any visible damp tracking. We can usually form a clear enough picture to give the customer a realistic sense of what they’re dealing with before any intrusive work begins. We’re not always right — sometimes what looks like a contained problem turns out to be more extensive once tiles come off — but we’re upfront about that uncertainty and we price accordingly.
Where the damage is genuinely limited to the grout and the substrate is confirmed sound, we will say so and recommend re-grouting or targeted silicone replacement. We don’t recommend rip-outs to generate larger jobs. What we do insist on is that any surface repair is done properly — which means correct joint preparation, the right material for the location, and silicone in every movement joint rather than grout. A corner filled with grout instead of silicone is a repair that will fail.
On a recent bathroom project in Hackney, a customer came to us having been quoted for a full bathroom refit by two other contractors. Both had looked at the shower, seen the damp staining below, and concluded it needed gutting. We did the tap test and found only four tiles with hollow spots, all in a corner section roughly 600mm square. The rest of the wet zone was solid. We removed those four tiles, found that the moisture-resistant board behind them was damaged but only in that section, replaced the affected board, re-tanked the corner properly, re-tiled, and finished with new silicone throughout the wet zone. The customer was back in the shower within a week and spent roughly a tenth of the refit quotes. That was over a year ago and there’s been no recurrence.
We understand that not every job has that outcome — sometimes the full rip-out really is necessary and the customer deserves to be told that clearly rather than discovering it halfway through a partial repair. Our commitment is to make that call honestly rather than in whichever direction produces a bigger invoice. The work we get through referral, which is the majority of our jobs in London, comes from customers who felt they were dealt with straight. That matters more to us than the margin on any individual project.
If you’re unsure whether your bathroom needs surface-level repair or structural remediation, the fastest way to find out is to ask someone who’ll look at it without a financial stake in the answer. We offer no-obligation assessments across London, and we’ll tell you what we find — including if we think the job is straightforward enough that you don’t need us.
Frequently Asked Questions
Can I re-grout a shower myself, or does it need a professional?
Re-grouting a shower is a task a careful DIYer can carry out — provided the diagnosis has already established that the substrate is sound and the tiles are all firmly bonded. The practical risks in doing it yourself are: not removing the old grout deeply enough (leaving a weak bond for the new material), using the wrong grout type (avoid unsanded grout in wide joints, avoid cement grout in movement joints), and filling corner angles with grout rather than silicone. If you’re confident in the prep and you’ve verified there’s no hollow tiles, a DIY re-grout in a limited area is reasonable. If there’s any doubt about what’s behind the tiles, we’d recommend having someone experienced do the assessment before you start.
How do I know if water has damaged the wall behind my tiles without removing them?
The most reliable non-intrusive test is a tap test — using a wooden dowel or the handle of a screwdriver, tap firmly across the face of every tile and listen for a change from a solid to a hollow or dull sound. Hollow tiles have lost their adhesive bond, almost always due to moisture behind them. Beyond that, look for grout lines that are darker or discoloured in specific areas (indicating water tracking), tiles that have started to lift at corners, silicone that has blackened through its depth rather than just on the surface, and — if accessible — damp staining on ceilings or walls in adjacent spaces. A sustained musty smell in the bathroom that persists after ventilating is also a reliable indicator of active moisture behind surfaces.
Is waterproof cladding over tiles a permanent solution, or will it fail eventually?
Waterproof cladding panels — when fitted over a dry, structurally sound tiled surface — can last well and provide a genuinely durable finish. The manufacturers typically quote ten to twenty-five years of service life, and in the right conditions that’s achievable. What accelerates failure is moisture trapped behind the new surface. If there is any active water ingress behind the existing tiles, cladding over them creates an enclosed damp environment that promotes mould growth and substrate degradation out of sight. The rule is straightforward: cladding over is only appropriate when the surface you’re covering is confirmed dry and intact. It is not a remedy for water leaking behind bathroom tiles — it is a cosmetic upgrade for a bathroom that is already sound.
How long does a partial tile repair typically take compared to a full refit?
A targeted repair — removing a section of tiles, replacing or treating the substrate in that area, re-tanking, and re-tiling — typically takes between one and three days depending on the size of the affected area and the curing time required for the waterproofing compound. A full bathroom refit in a standard London flat or terraced house usually runs between five and ten working days. The partial repair obviously represents a significantly lower disruption and cost — but it’s only the right choice when the damage is genuinely contained. Doing a partial repair on a bathroom where the substrate has failed across the whole wet zone typically means returning within a year or two to do the rip-out that should have happened the first time.
What causes grout to keep cracking in the same place?
Grout that cracks repeatedly in the same joint — particularly at internal corners and along the perimeter of a bath or shower tray — is almost always indicating a movement joint that has been filled with a rigid material instead of a flexible one. Internal corners, and any joint between two different planes or surfaces, need to be finished in silicone sealant because those joints flex with the natural thermal movement and settling of the building. Grout, being rigid, cannot accommodate that movement and will crack. If the same grout joint keeps failing, the answer isn’t better grout — it’s replacing the grout in that joint with the correct flexible sealant and addressing any underlying movement or substrate issue that may be making the movement worse than normal.
Ready to move from confusion to construction? Get in touch with Fixiz today for a no-pressure chat about your project and the fastest route to full compliance.