Physical address:
128 City Road, EC1V 2NX, London,UK
You press your foot against the bathroom floor and feel the unmistakable give — a squelch beneath the tiles, or a patch of carpet outside the door that never dries. If that sounds familiar, you are dealing with an underfloor bathroom leak trace and access insurance UK situation, and the question keeping you up at night is: how much will need to come apart? We have investigated hundreds of these leaks across London — from Victorian terraces in Islington to new-build flats in Canary Wharf — and the honest answer is that the level of destruction depends almost entirely on how methodically you approach the diagnosis. Work through the right sequence and you may trace the same leak with nothing more than a moisture meter and a pressure gauge. This article walks you through that sequence, explains when tiles do need to come up, and sets out how trace and access cover works so you can document your claim from day one.
How to Isolate the Leak Source — Shower Tray, Grout, Silicone, or Pipework
The single biggest mistake homeowners make is assuming the worst. A wet subfloor does not automatically mean a burst pipe — in our experience, the majority of underfloor bathroom leaks originate at a surface-level failure that went unnoticed for months. Before any investigation, it helps to understand the four primary sources.
- Shower tray failure: Acrylic and stone-resin trays flex slightly every time you step in. Over time, that movement cracks the silicone seal around the perimeter, allowing water to migrate beneath the tray and through the floor construction — particularly common where the tray is bedded on a thin mortar screed rather than a solid, full base.
- Grout failure: Grout is water-resistant at best, and only when freshly sealed. In wet zones around the base of a shower enclosure, grout cracks and becomes porous within two to three years without resealing, allowing water to track through the tile bed and into the substrate below.
- Silicone joint breakdown: Every internal corner in a wet area should be sealed with sanitary silicone rather than grout. Silicone ages, loses adhesion, and a failed bead between the shower tray and the wall tiles is one of the most common causes of slow, persistent leaks we see in London properties.
- Pipework failure: Supply pipes, waste pipes, and trap connections can all leak. Push-fit joints are particularly susceptible if a pipe was not cut cleanly or a fitting was not fully engaged. Waste pipes through floor joists are the least common culprit when a leak is slow and steady rather than sudden.
To isolate the source, start with the surface. Leave the bathroom unused for 24 hours with ventilation open, then run the shower for five minutes with the door closed. Watch the base of the shower tray, the tray-to-wall junction, and the drain surround. Water appearing at any of those points confirms the source without touching a single tile.
Tip: Mark suspect areas with a dry-wipe pen before the test — it makes photographing for an insurance claim far easier and stops you second-guessing yourself later.
If the surface check is inconclusive, check the toilet next. Shut off the isolation valve and monitor whether moisture readings change over 12 hours. We traced a persistent damp problem in a Hampstead bathroom last year entirely to a fill valve trickling 20 millilitres per minute — the homeowner had been planning a full floor excavation before we arrived.
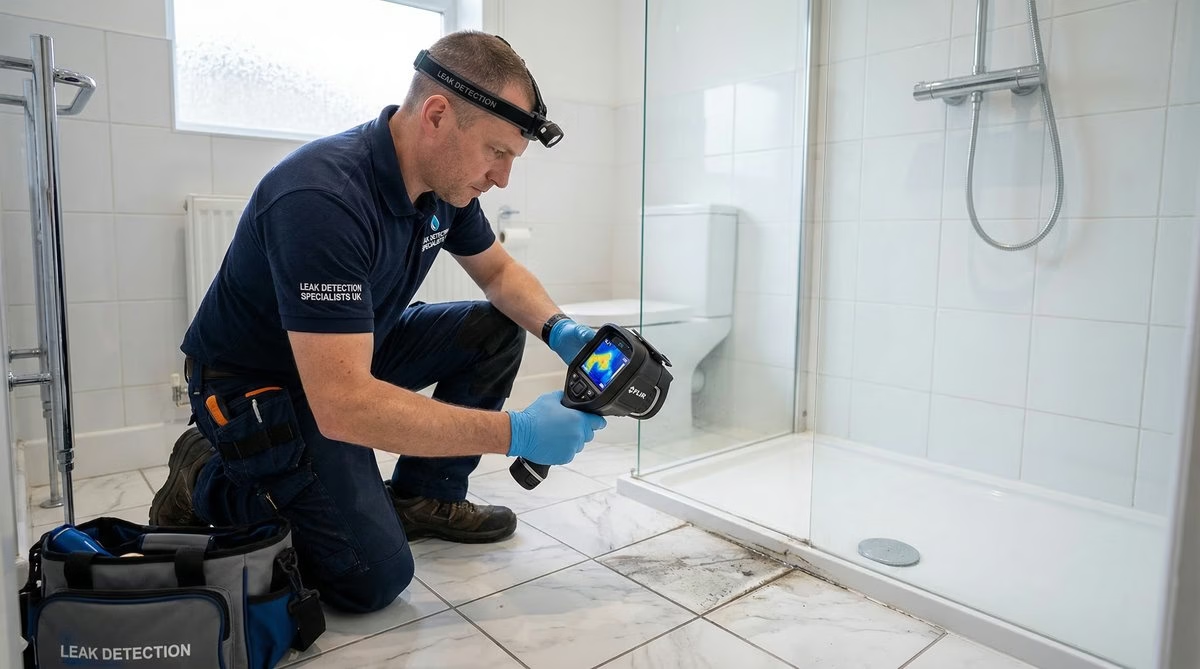
Non-Destructive Checks First — Moisture Mapping, Thermal Imaging, and Pressure Testing
Modern leak detection has moved well beyond lifting tiles and hoping for the best. When we attend a bathroom water leak investigation, we deploy three non-destructive tools before any physical opening-up — each narrows the search area before the next is used.
- Moisture mapping with a pin or capacitance meter: Worked systematically across the floor and lower walls in a grid pattern, a calibrated moisture meter produces a contour map of elevated readings that clusters around the leak source. This alone tells us whether the problem is central to the shower area or has migrated to a joist bay three feet away — the difference between replacing two tiles and lifting a metre-square section of floor.
- Thermal imaging: A thermal camera detects temperature differentials caused by evaporating moisture. Active leaks from pressurised pipes show as cool patches that grow between scans. In solid concrete floors, running the survey before and after operating the shower captures the leak path with remarkable precision.
- Pressure testing the supply pipework: Isolating sections of hot and cold supply and testing each under static pressure confirms or rules out pipework failure without opening anything up. A section that holds pressure is clear; one that drops tells us exactly where to cut.
- Acoustic listening devices: For properties with longer pipe runs — common in mansion blocks across areas like Kensington or Bethnal Green — acoustic equipment detects the sound signature of pressurised water escaping through a small aperture, most effectively on cold mains where pressure is highest.
The value of this sequence cannot be overstated for an insurance claim. Insurers offering trace and access cover want evidence that investigation was methodical and destructive work was the minimum necessary. A report documenting moisture mapping, thermal results, and pressure test data is a far stronger submission than one that simply records “tiles lifted.”
Tip: Ask your leak detection specialist to produce a written report with photographs at each stage — it is the evidence package your insurer needs to process the claim without delay.
We attended a property in Peckham where the homeowner had already been quoted £3,200 to lift the entire shower floor. Our thermal survey identified a single cold water supply joint weeping under a corner of the tray. Total opening-up area: four tiles. Total investigation time: two hours. The non-destructive phase preserved the validity of the trace and access claim by demonstrating proportionate investigation.
When Tiles Need to Come Up — and How to Minimise the Damage
There are situations where physical access is unavoidable — no amount of thermal imaging removes the need to reach a confirmed leak in a buried waste pipe or a cracked drain connection beneath concrete screed. When that point is reached, the goal shifts to precision: the smallest opening necessary, everything documented, and the substrate properly prepared for reinstatement.
The first principle is to cut rather than smash. A diamond blade on an angle grinder, scored along grout joints before lifting, preserves adjacent tiles and makes regrouting — rather than replacing — far more likely. Hammering out from the centre destroys the tile and frequently cracks neighbours.
- Mark the opening before cutting: Define the minimum access area using moisture map data, photograph it, and stick to it. Every additional tile lifted unnecessarily is avoidable cost and disruption.
- Retain tile samples: If your tiles are discontinued — extremely common in properties over ten years old — keep every intact tile you remove. They become your reinstatement stock. We have seen investigations become full re-tiles simply because no one thought to save the originals.
- Dry the substrate before reinstating: Lifting tiles over a wet subfloor and immediately relaying is a guarantee of failure. Timber or plywood must reach below 75% relative humidity — in a London winter with dehumidifier equipment running, this can take a week.
- Photograph the leak source in situ: Before any repair is made, photograph the fault at close range with a scale reference. This image is essential for insurance documentation and any dispute about whether the leak was sudden or gradual.
Tip: If your property is in a mansion block or converted period building, notify the building manager before any floor is opened — lease agreements commonly require consent, and failing to do so can complicate both your claim and your relationship with the building’s insurer.
We recently worked on a 1930s conversion in Crouch End where a failed waste pipe junction sat beneath 22mm of screed and a porcelain tile floor. By cutting access from below — through the ceiling of the room underneath — we reached the joint without touching a single floor tile. Not every property allows this, but it is always worth considering before committing to a top-down approach.
Insurance Trace and Access — What’s Covered, How to Document It, and the Checklist That Speeds Up Your Claim
Trace and access cover is a specific section of most UK home insurance policies — and one of the most misunderstood. It does not cover the repair of the leak itself. It covers the reasonable cost of finding the leak and reinstating the materials opened to reach it. Understanding this distinction prevents the most common claim dispute: expecting your insurer to pay for a new shower tray when the policy covers only the four tiles lifted to access the pipe.
Policies vary significantly. Some cap trace and access at £5,000; others at £25,000 or more. Almost all require the leak to be “sudden and accidental” rather than the result of long-term wear — which is why the leak source photograph and investigation timeline matter. A leak dripping for two years is unlikely to be covered; a fitting that failed overnight almost certainly is.
- Notify your insurer before starting any opening-up work: This is the single most important step. Insurers can appoint their own loss adjuster to attend before investigation begins, and starting without notification can invalidate the claim entirely.
- Obtain a written scope of works: A scope that describes exactly what will be opened, why, and how it will be reinstated allows your insurer to pre-authorise expenditure and prevents disputes later about whether the work was reasonable.
- Keep all receipts and VAT invoices: Trace and access claims are reimbursement-based. Every contractor should provide a VAT invoice itemising labour separately from materials.
- Document condition before work begins: A video walkthrough of the bathroom before any investigation — showing existing tiles, floor coverings, and pre-existing damage — protects you against later disputes about the condition at the point the claim arose.
- Confirm the leak source in writing: Your contractor’s written report confirming the leak source, cause, and repair is the closing evidence your insurer needs to process the reinstatement element of the claim.
One important nuance: reinstatement under UK insurance trace and access is covered to a standard matching the surrounding area, not the original specification. If you had bespoke stone tiles and the insurer’s allowance covers ceramic alternatives, you will need to make up the difference — get written clarity on this before work begins.
Tip: If your insurer disputes whether the leak qualifies as sudden and accidental, an independent plumber’s report on the failure mode and timeline can be sufficient grounds for reconsideration — and the Financial Ombudsman Service provides a free escalation route.
How Fixiz Handles Bathroom Leak Investigations — Diagnosis Before Destruction
Our approach at Fixiz is built around a single principle: no tile comes up until we have exhausted the non-destructive options. When we receive a call about a suspected underfloor bathroom leak, our first visit is an investigation appointment — not a repair appointment. We arrive with moisture mapping equipment, a thermal imaging camera, and pressure testing kit, and produce a written scope of works only once we have a clear picture of moisture concentration and the most likely source. That means every recommendation we make is evidence-based rather than speculative.
We work across London — from period properties in Barnes and Richmond to modern developments in Stratford and Greenwich — and that variety of construction types means a one-size-fits-all approach does not work. A Victorian timber floor requires a completely different investigation strategy to a post-war concrete screed, and a ground-floor flat has access options a fourth-floor apartment does not. Our surveyors read the building before they read the leak.
For clients pursuing insurance claims, we provide a full investigation report meeting the documentation requirements of the major UK household insurers — moisture reading grids, annotated thermal images, pressure test logs, and a clear statement of leak source and cause. We liaise directly with loss adjusters where required, which clients tell us considerably reduces stress during an already disruptive process.
On a recent job in Hackney, a client had been living with a damp patch beneath the bathroom floor for six months, convinced it would require a full renovation. Our investigation identified a hairline crack in the shower waste connection — a 40-minute repair once exposed. Total disruption: one week. Total area opened: less than a quarter of a square metre. That is the outcome we aim for on every job.
Frequently Asked Questions
Does home insurance always cover trace and access for a bathroom leak?
Not automatically. Trace and access cover is a named section within most UK buildings insurance policies, but cover levels and conditions vary widely. Most policies require the leak to be sudden and accidental rather than gradual deterioration. Check your policy schedule for the specific limit and any exclusions around shower trays or drainage systems, and always notify your insurer before investigation begins to preserve the claim.
How long does a bathroom leak investigation typically take?
A non-destructive investigation using moisture mapping and thermal imaging typically takes two to four hours. Pressure testing across multiple pipe sections can extend this to a full day. Where physical access is required, the repair phase runs from one day for a straightforward joint failure to a week or more where screed needs extended drying time before reinstatement.
Can I use the same contractor for the investigation and the repair?
Yes — and it is usually more efficient. A single contractor covering both the investigation report and reinstatement simplifies the documentation trail and avoids disputes about what was found. The key requirement is that the investigation is conducted properly — with moisture mapping and a written report — not that a separate specialist carries it out.
My tiles are discontinued — what happens if they need to come up?
Your insurer’s obligation is to reinstate the opened area to a comparable standard, not the original specification. Options include relaying the lifted tiles if undamaged, sourcing close matches from reclaim suppliers, or agreeing a full re-tile with the insurer contributing up to the trace and access limit. We advise on all three routes and provide cost comparisons before any decision.
What is the difference between a trace and access claim and a water damage claim?
A trace and access claim covers finding the leak — investigation, opening floors or walls, and reinstating those surfaces. A water damage claim covers the consequential damage — damaged joists, affected ceilings, saturated insulation, ruined floor coverings. Both can arise from the same leak event but are assessed separately with different limits and excesses. Confirm whether to submit them together or sequentially, as the order affects how your excess is applied.
Ready to move from confusion to construction? Get in touch with Fixiz today for a no-pressure chat about your project and the fastest route to full compliance.