Physical address:
128 City Road, EC1V 2NX, London,UK
You’ve just had a new worktop fitted. The installer has packed up and left. You step back to admire the result — and then you notice it. A gap. Sometimes a couple of millimetres, sometimes a full centimetre or more, running between the back edge of the worktop and the wall. If you’re planning to tile a splashback, your heart sinks — because that gap means your first row of tiles won’t sit flat, and everything above it is likely to drift out of line. This is one of the most common frustrations we hear from homeowners across London, from Hackney to Hammersmith. The good news is that the kitchen worktop gap wall splashback tiling fix UK has several professional routes — and this article walks through each of them, honestly and practically.
Why worktop-to-wall gaps happen — uneven walls, square-edge tops, and missing scribing
In an ideal world, a kitchen wall would be perfectly plumb and straight, the worktop would sit flush against it, and tiling would begin from a clean level baseline. In the real world — and especially in London’s older housing stock, where Victorian terraces and 1930s semis dominate — walls are rarely straight. They bow, they lean, they have lumps of old plaster or uneven brickwork behind the skim coat. Even relatively modern builds aren’t immune: a wall that looks straight to the naked eye can deviate by 10–15mm over a couple of metres.
The worktop compounds the issue. Most worktops — whether laminate, solid wood, or compact laminate — are manufactured with a perfectly straight back edge. That factory edge sits against a wall that has no tolerance at all. The result is a gap that varies in width along its length: sometimes 3mm, sometimes 12mm. This inconsistency is what makes tiling so difficult, because a consistent gap is always easier to manage than a variable one.
The professional solution is scribing — running a compass along the back of the worktop while it sits loosely in place, transferring the wall’s exact profile onto the worktop surface, and cutting to that line with a jigsaw. When done correctly, the worktop edge mirrors the wall so closely that the gap disappears, or reduces to a hairline that silicone can bridge invisibly. It adds time and skill to a kitchen fit, which is why it gets skipped. We’ve been called out to properties in Islington and Stoke Newington where worktops were clearly never scribed at all — installed in a hurry, left with visible gaps the homeowner only discovered when they came to tile.
Square-edge worktops are particularly unforgiving. Because there’s no rolled lip to hide movement, any gap at the wall is immediately visible. There are also situations where the gap exists not because of wall irregularity but because the worktop was simply not pushed back far enough — or has moved slightly since installation due to seasonal timber movement or inadequate fixings. Understanding which category your worktop falls into is the first step in choosing the right fix.
The upstand option — when it works, when it doesn’t, and how to get a clean finish
An upstand is a strip of matching material — typically in the same finish as the worktop — that sits on top of the worktop surface and runs up the wall behind it, covering the gap entirely. When it’s executed well, it looks clean and intentional. When it’s executed badly, it draws the eye straight to the problem it was meant to hide.
Upstands come in various heights — 70mm, 100mm, and 150mm are common — and are sold in the same finish as the worktop. The upstand sits with its bottom edge on the worktop surface, its back face pressed against the wall, and silicone seals both joints. The catch is the scribing problem, now applied to a different surface. If the wall is uneven, the back of the upstand won’t sit flush. For minor deviation — up to about 3–4mm — a generous silicone bead, tooled neatly, will bridge this. For larger deviations, the upstand itself may need scribing to the wall.
There’s a significant limitation: upstands preclude full-height tiling behind them. If your plan is to tile from worktop to underside of wall units, an upstand gets in the way. So the upstand option works best in kitchens where the splashback zone will be painted, left as plaster, or covered with a solid panel rather than tiles. We fitted upstands in a Victorian conversion in Clapham recently where the homeowner had chosen a solid-colour panel rather than tiles — the upstand sat cleanly, the silicone joints were neat, and the finish looked deliberate rather than remedial. The key is continuous adhesive bedding, clean silicone tooling, and taking the time to get both joints consistent along the full length. Rushed silicone work is the most common reason upstands look amateurish, and it’s entirely avoidable with a bit of patience.
Tiling over the gap — wall prep, adhesive thickness, and the sequencing that avoids wonky rows
If you’re committed to a tiled splashback — and most London homeowners are, because tiles offer durability and the widest aesthetic range — the gap between worktop and wall must be addressed before a single tile goes up. Tiling directly over an unfilled gap means the first row will either follow the uneven worktop edge or the wall face — and neither outcome is acceptable in a professional installation.
Wall preparation comes first. Any loose plaster, unbonded paint, or old adhesive residue needs to come off. The goal is a surface that is clean, sound, and as flat as you can get it. Once the wall is prepped, the gap needs addressing. For gaps up to about 6mm, a flexible filler — or tile adhesive used as a levelling bed — can bridge the gap and create a datum for the first row. For gaps larger than this, we recommend a two-stage approach: first, pack the gap with a non-shrink filler or render to bring the wall face up approximately level with the worktop edge; then, once fully cured, apply the tile adhesive as a final levelling bed. This staged approach prevents adhesive shrinkage from pulling the first tile row out of level after installation.
For gaps over 6mm, switch to a thick-bed adhesive — designed for beds up to 15mm — rather than standard wall tile adhesive. We use this routinely on splashback tiling jobs in older London properties where the wall behind the worktop can be anything from moderately bowed to genuinely chaotic.
Sequencing is critical. Set your datum line by finding the high point of the worktop and measuring up one full tile height. Strike a level line here using a spirit level or laser. Tile down from this line to the worktop, cutting the bottom row to fit. Any variation in the gap is absorbed in the adhesive bed of the bottom row — all tiles above it are set from a guaranteed-level reference. Finally, always finish the worktop-to-tile joint with silicone, not grout. Grout is rigid and will crack as the worktop moves seasonally. A flexible silicone joint in a matching colour also hides any remaining gap variation at worktop level.
Other fixes — re-setting worktops, filler strips, silicone joints, and when to just re-fit
Sometimes the best fix is to go back to basics. If the worktop was never properly scribed, the cleanest long-term solution is to lift it, scribe it properly, and re-fit it. This is disruptive — you’ll need to disconnect any sink, remove the worktop, mark and cut the profile, and reinstall — but it eliminates the gap rather than concealing it. In kitchens where the worktop is a premium material worth preserving, this is nearly always the right call. The cost of a re-fit is almost always less than the cost of the workarounds you’d otherwise layer on top.
Filler strips are a practical middle ground: thin strips of matching worktop material — or a contrasting trim — routed into the gap and glued in place, then sanded flush. This is a joinery solution that works best where the worktop will be left exposed rather than tiled behind. A well-executed filler strip can be nearly invisible and gives you a solid, flat surface with no silicone dependency. The main alternatives break down like this:
- Silicone only — acceptable for gaps up to 4mm; not a permanent fix for anything wider and prone to mildew in kitchen conditions
- Upstand — covers the gap cleanly but prevents full-height tiling; best for painted or panelled splashbacks
- Filler strip — joinery fix, best for exposed worktops where tiling isn’t planned
- Re-scribing and re-fitting — the definitive fix, particularly before any significant tiling investment
We worked on a new-build flat in Greenwich recently where worktops had been installed on inadequate fixings, shifted slightly after use, and opened a gap not on the original snagging list. More silicone would have been a sticking plaster. The fix was a proper re-fit. The honest answer to “when should I just re-fit?” is: whenever you’re planning to spend significant money on tiling on top of the existing worktop. Fix the foundation first.
How Fixiz installs kitchens — measure twice, scribe once, tile cleanly
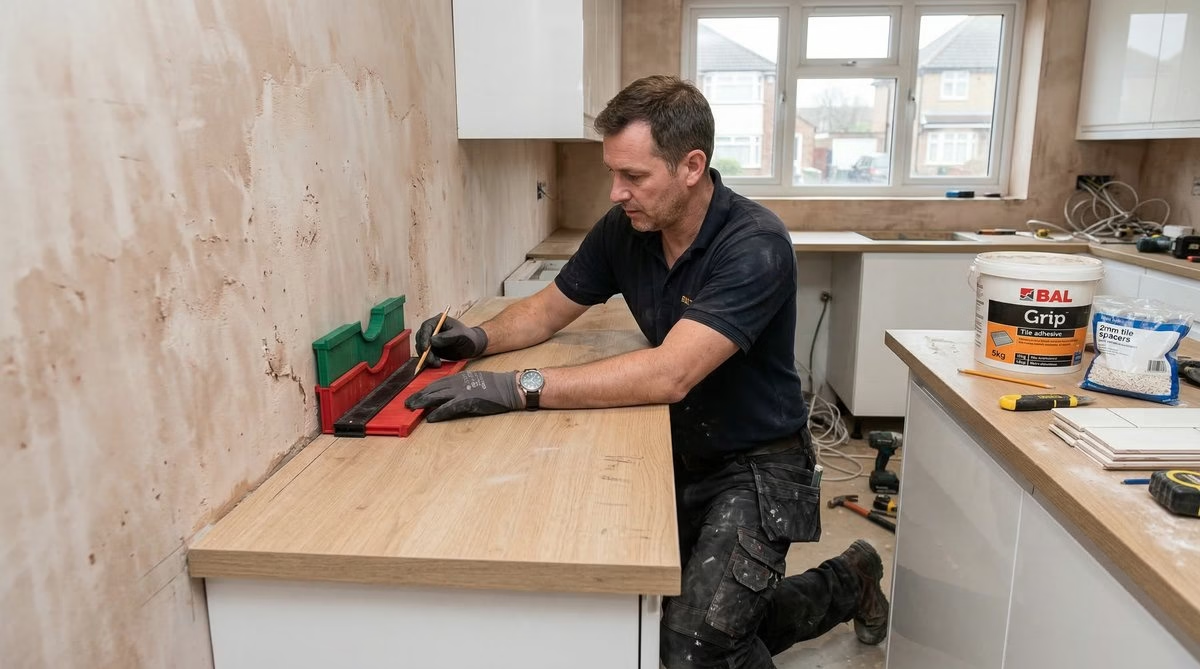
At Fixiz, our approach starts with a thorough site survey that includes checking wall flatness across the entire worktop run before anything is ordered or cut. We use a 1.8-metre spirit level to identify high and low points along the wall and record the maximum deviation. This tells us whether the worktop will need scribing, and whether the wall needs remedial work before tiling. Catching this at survey stage costs nothing. Catching it after the worktop is installed costs time and money.
When we scribe a worktop, we do it on site with the worktop loose in position. We set it level using adjustable legs, mark the wall profile onto the back edge using a scribing compass set to the widest gap measurement, and cut to the line with a jigsaw — keeping the blade perpendicular so the cut edge sits flush against the wall face. The worktop is then dry-fitted to check the profile, adjusted with a belt sander if needed, and only then fixed down permanently.
For splashback tiling, we always strike our own datum lines regardless of what the worktop surface says. We’ve tiled kitchens across London — Wimbledon, Tooting, Chiswick, Finsbury Park — and we’ve never yet encountered a worktop level enough across its full run to use as a direct tiling datum. Our datum lines come from a laser level and get checked at multiple points before the first tile goes up. We also plan the full tile layout before mixing any adhesive: confirming where cuts will fall, ensuring first and last tiles in each row are balanced, and identifying tiles needing notching around sockets or switches. Finally, every splashback gets a silicone joint at the worktop-to-tile interface and a penetrating sealer applied before handover — because grout starts absorbing cooking residue almost immediately, and sealing on installation day is the single most effective thing you can do to keep it clean long-term.
Frequently asked questions
How big a gap between worktop and wall is acceptable before I need to act?
A gap up to 3–4mm can usually be managed with a neat silicone bead applied directly into the joint — cosmetically acceptable and waterproof if applied correctly. A gap of 5–10mm needs a more considered approach: an upstand, a filler strip, or a tiling method that builds up the adhesive bed. A gap of 10mm or more almost always means the worktop was never scribed — the cleanest fix is to address the scribing rather than paper over the gap. For tiling purposes, any variable gap wider than 6mm makes achieving a straight first tile row very difficult without a separate packing or levelling stage.
Can I tile a splashback if my worktop has an integrated upstand?
You can, but it requires care. An integrated upstand typically covers the gap and sits tight to the wall. Tile from the top of the upstand upwards — setting your datum line from a laser, not from the upstand itself. Always leave a silicone joint between the top of the upstand and the first tile row; never grout this joint, as movement in the upstand will crack rigid grout within the first year. If you want to remove the upstand and tile the full wall height instead, it needs to come off before tiling begins, and all adhesive residue behind it must be fully cleaned before new tiles go on.
What tile adhesive should I use where there’s a significant wall-to-worktop gap?
For gaps up to about 6mm, a standard flexible wall tile adhesive applied at full thickness will cope. For gaps greater than 6mm, use a thick-bed adhesive — designed for beds of 6–15mm — which has a lower shrinkage rate and better bond integrity in thicker applications. Avoid using standard adhesive at excessive depth; shrinkage as it cures can move the tile slightly and affect alignment. If the gap varies along its length, pack the widest sections with a non-shrink filler first, allow it to fully cure, then apply adhesive as a finishing bed at consistent thickness. Always use flexible adhesive — never rigid — for kitchen splashbacks.
Is it worth re-fitting a worktop just to close the gap before tiling?
In most cases, yes — particularly if you’re investing in quality tiles or a full-height splashback. The gap affects every row of tiles above it: if the first row isn’t sitting on a flat, consistent base, it becomes progressively harder to keep rows above it straight and evenly jointed. Re-fitting a worktop to scribe it properly typically takes a half day for a standard kitchen run. The alternative — building up adhesive, using thick silicone joints, or accepting misalignment — creates ongoing maintenance requirements and often looks noticeably remedial on close inspection. If the worktop material is good and the rest of the kitchen is sound, re-scribing is almost always the right call.
How do I stop grout cracking at the joint between the tiles and the worktop?
Never grout the joint between the bottom row of tiles and the worktop surface. That joint must be silicone — a flexible, waterproof sealant that moves with the worktop as it expands and contracts. Grout is rigid and any movement in the worktop will crack it, typically within the first year. Use a silicone colour matched to your grout for a seamless look, or a contrasting colour for a deliberate trim effect. Apply in a single continuous bead, tool it to a consistent radius with a wet finger or silicone tool, and keep the joint dry for 24 hours before exposing it to moisture.
Ready to move from confusion to construction? Get in touch with Fixiz today for a no-pressure chat about your project and the fastest route to full compliance.