Physical address:
128 City Road, EC1V 2NX, London,UK
If you’ve ever pushed a kitchen base unit back against the wall and found yourself staring at a yawning gap — sometimes as wide as 6 cm — you are not alone. Kitchen units not flush with the wall is one of the most frustrating problems in any kitchen installation, and it catches homeowners and even some tradespeople completely off guard. Older UK properties, and London homes in particular, are riddled with walls that bow, lean, or simply refuse to play by the rules of a set square. Understanding why the gap appears — and knowing exactly how to close it — is the difference between a kitchen that looks hand-built and one that looks as if it was installed in a hurry.
Why Kitchen Units Won’t Sit Flush — The Real Causes
Before reaching for the silicone gun, it helps to understand what is actually causing the problem. In our experience fitting kitchens across London, the gap between a unit and the wall almost always comes down to one of four root causes — and in older properties, all four can be present simultaneously.
- Walls that are not plumb: In Victorian and Edwardian properties especially, internal walls are rarely truly vertical. A wall that leans away from the unit at the top but sits closer at the bottom will push the back of the unit away from the wall face entirely, leaving a visible gap at the rear of the worktop.
- Concrete skirting that projects past the wall face: This is particularly common in 1960s and 1970s London flats and ex-council properties. The concrete skirting — sometimes called a concrete plinth or screed upstand — was cast in situ and often projects 30–60 mm further into the room than the plaster above it. A base unit sitting on the floor is effectively being pushed away from the wall by the skirting before it has any chance of sitting flush.
- Floors that are not level: Timber suspended floors in older terraces flex, bounce, and slope in ways that modern chipboard subfloors do not. If the floor dips away from the wall, the base of the unit will lift away from the wall at the back even if the wall itself is perfectly flat.
- Corners that are not square: A room that measures 90° on a drawing rarely measures 90° in reality. When a run of units reaches the corner, the accumulated error can push the final unit several centimetres away from the adjacent wall. This is the scenario that leaves a triangular gap in the corner that no amount of wishful thinking will close.
We recently surveyed a kitchen in Hackney where a curved concrete skirting — subtle enough to be invisible to the eye — created a gap of nearly 6 cm at its widest point. Properties built between 1950 and 1980 regularly produce this problem, and it requires a considered approach rather than a quick bodge.
Tip: Before ordering your kitchen, hold a long spirit level or a straight batten against the wall at base unit height and again at the floor. Note where the wall bows in or out and measure the maximum deviation. This single five-minute step will tell you which fixing strategy you need before a single unit is delivered.
The Main Fixes — From Scribing to Shimming
There is no single universal solution to gaps between kitchen units and walls, because the cause of the gap dictates the remedy. Here are the main approaches we use, in order of complexity.
Scribing a Filler Strip or End Panel
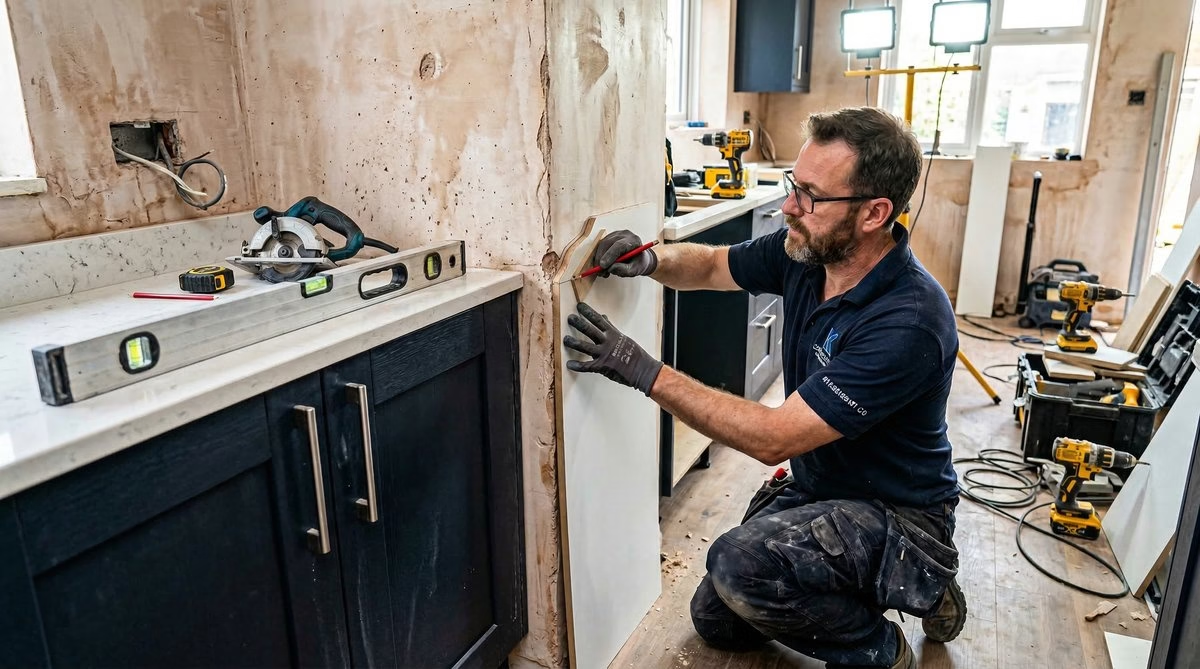
Scribing is the traditional joinery technique for fitting a flat panel against an uneven surface. A filler strip — a narrow piece of matching cabinet material — is held against the wall while a pencil or scribe tool traces the wall’s profile onto it. The strip is then cut along that line and, when fitted, follows every bump and hollow in the wall precisely, leaving no gap. The same technique works on end panels on the final unit in a run, or as a standalone filler strip between the face frame of the last unit and the adjacent wall. We use this approach on virtually every London kitchen job where the wall deviation is more than 10 mm — which, in our experience, is the majority of them.
Removing the Skirting Board Before Fitting
Where a timber skirting board projects past the wall face, remove it before the units go in. The unit then sits flat against the plaster and the kitchen plinth covers the floor line. Concrete skirting cannot simply be prised off — grinding or chiselling it back is messy and time-consuming, so the scribing approach is usually the better option in those cases.
When to Remove Skirting and When to Leave It
The decision is mostly practical. Remove timber skirting when:
- The projection is more than 10–15 mm: Beyond this, shimming or scribing becomes unwieldy.
- You are fitting a full run of base units: Removing the skirting gives a cleaner result and avoids the units rocking on the skirting edge.
- The skirting is in poor condition: If it is going to be hidden behind units, there is no reason to preserve it.
Leave skirting in place when:
- It is concrete or structural: Grinding back concrete skirting is a last resort — always try scribing first.
- Only one or two units are affected: For a short run, a filler strip is quicker than skirting removal.
- The gap can be closed with a deeper worktop: See below.
Using a Deeper Worktop to Overhang the Gap
Standard UK kitchen worktops are 600 mm deep, but 650 mm worktops are available. That extra 50 mm sits entirely at the back, bridging a gap between unit and wall. This works best when the gap is consistent along the full run — if it varies, as it does on a curved wall, the worktop bridges the widest point but a silicone bead is still needed where the gap is smaller.
Packing and Shimming the Units
Where the floor is uneven, pack units up on adjustable legs or hardwood shims before anything else. Shimming corrects for an unlevel floor; it does not fix a wall that is out of plumb. If both problems exist — and they often do — address each one with its own remedy rather than trying to compensate for both at once.
The Right Order of Work
Getting the sequence right is just as important as choosing the right technique. In our kitchen fitting work we always follow this order — and we have seen costly problems arise when any step is skipped.
- Prepare the wall: Remove skirting where appropriate, mark a level datum line around the room, and note all deviations from plumb and level.
- Level the units first: Before a single screw goes into the wall, every unit must be level side-to-side and front-to-back. Use the adjustable legs or shims to achieve this. Check repeatedly with a long spirit level across multiple units.
- Fix the units to the wall: Once level, screw the hanging rail or back panel to the wall. Do not over-tighten — you may need to make small adjustments.
- Scribe to the wall: With units fixed and level, cut and fit filler strips or end panels scribed to the wall profile.
- Fit the worktop: Cut the worktop to length, fit any joins, and ensure the worktop sits level and makes good contact with the wall at the back.
- Silicone last: Only once the worktop is fitted and the scribed panels are in place should you apply silicone to the joint between worktop and wall. Siliconing before everything is truly in its final position is a common source of callbacks — the silicone cracks as things settle, or it conceals a gap that should have been closed with a scribed panel.
Rushing the levelness check is a false economy. Correcting a unit that has been screwed to the wall at the wrong height means removing fixings, repositioning, and potentially redrilling through plasterwork. Thirty seconds with a level at the start saves hours later.
Tip: Use a coloured pencil to mark your level datum line — it is far easier to see from a distance when checking whether units are sitting at the right height.
Common Mistakes — And How to Avoid Them
We have remedied a lot of kitchen fitting problems that originated in shortcuts taken during the installation. The same mistakes come up repeatedly.
- Cutting notches into the back of units to clear skirting: This weakens the carcass significantly. Base units support the weight of the worktop, sink, and everything stored inside — cutting into the back compromises that. Always scribe a filler panel instead.
- Screwing units to the wall before checking level: We have taken apart entire runs that were fixed at the wrong height because someone skipped this step. Thirty seconds with a level beforehand saves hours of remedial work.
- Leaving a visible gap behind the worktop: A gap at the back of the worktop allows water to penetrate behind the units, causing mould and swelling. Close it with a scribed upstand, a tiled splashback, or at minimum a bead of good-quality silicone.
- Not using a long enough spirit level: A 600 mm level shows whether a single unit is level; it will not reveal a tilt across a full run. Use a 1200 mm or longer level, or a laser level, across the whole run.
- Applying silicone to a dusty or damp surface: Silicone will not bond to a surface that has not been cleaned first. Wipe down with methylated spirits and allow to dry before applying.
One of the most memorable call-outs we attended was in a 1930s terrace in Lewisham where the fitter had notched the back of every base unit to clear a projecting plinth. Within a year the carcasses were racking, drawer fronts were dropping, and the worktop had started to dip. Replacing the units cost more than the original fitting bill and disrupted a kitchen that had been in use for under a year. Every one traced back to a shortcut that took minutes to make and months to undo.
How Fixiz Approaches Kitchen Fitting in Older Properties
Fitting a kitchen in a Victorian terrace, an Edwardian flat, or a post-war London property is a genuinely different task from fitting a kitchen in a new-build. The walls move. The floors slope. The corners are not square. Every room has its own character, and a skilled fitter’s job is to make the kitchen look as though it was designed and built for that space specifically.
When we take on a kitchen fitting job, we start with a thorough survey before any units are ordered. We measure wall deviation at base unit height, check the floor level across the full run, test the corners with a set square, and look specifically for projecting skirting or screed. Where concrete skirting is present, we advise scribing filler panels rather than attempting to cut back the concrete.
We always level units before fixing, scribe filler strips and end panels to the wall profile, and apply silicone only at the very end. We do not notch the backs of units, we do not leave gaps behind worktops, and we do not skip the levelness checks — these are the baseline standard for kitchen fitting done properly.
Tip: If you are considering a DIY kitchen installation in an older property, invest in a laser level before you start. It will pay for itself many times over in time saved and mistakes avoided.
The Hackney homeowner we mentioned earlier — the one with the 6 cm curved concrete skirting — ended up with a beautifully fitted kitchen. The solution combined standing units slightly proud of the skirting, fitting a scribed filler panel at the face frame, and using a 650 mm worktop to bridge the rear gap. It took careful planning and an extra half-day, but it was entirely achievable without touching the concrete at all.
Frequently Asked Questions
Can I just fill a gap between my kitchen unit and the wall with silicone?
For gaps up to around 5 mm, a neat bead of colour-matched silicone at the back edge of the worktop is acceptable. For larger gaps, silicone alone will look unsightly, trap dirt, and will not last. Close the gap with a scribed filler strip first, then apply silicone to the finished joint.
Should I remove the skirting board before fitting kitchen units?
In most cases, yes. If timber skirting projects past the wall face, removing it before the units go in gives the cleanest result — the plinth then covers the floor line. If the skirting is concrete or part of a structural screed upstand, leave it and use the scribing approach instead.
What is a scribed filler strip and how is it made?
A scribed filler strip is a narrow piece of cabinet-matching material cut to follow the exact profile of an uneven wall. Hold the strip in its final position, run a scribing tool or pencil-and-block along the wall surface to transfer the wall’s shape onto the strip, then cut along the marked line with a jigsaw. Fitted in place, it sits snugly against even a curved or bowed wall with no visible gap.
My kitchen corner has a large gap — what causes this and how do I fix it?
Corner gaps almost always result from a room corner that is not at 90°. The end unit is pushed away from the adjacent wall, leaving a triangular void. Fit a scribed corner filler panel to close it. In some cases, a deeper corner unit or a carousel unit makes better use of the space while eliminating the gap at the same time.
Is a 650 mm worktop the same as a standard worktop, just wider?
Yes — a 650 mm worktop is simply a wider version of the standard 600 mm worktop. It overhangs the base units by 50 mm more at the back, which is used to bridge a gap between the unit and the wall. The front overhang remains standard. Not all worktop ranges are available in 650 mm depth, so check availability before making it the basis of your installation plan.
Why do kitchen units in older London properties so often have fitting problems?
Older properties were built using methods that produced walls, floors, and corners with far greater variation than modern buildings. Plaster was hand-applied to a variable thickness, floors were laid without precision levelling compounds, and concrete skirting upstands were cast without any requirement to be flush with the plaster above. Rooms that look square are often significantly out of tolerance when measured — and a skilled fitter spends as much time on survey and scribing as on the installation itself.
Ready to move from confusion to construction? Get in touch with Fixiz today for a no-pressure chat about your project and the fastest route to full compliance.