Physical address:
128 City Road, EC1V 2NX, London,UK
You paid for the repair, watched the walls dry out, and felt relief — only to spot the same damp patches creeping back. When a leak comes back after repair UK flat owners know the sinking feeling well. A returning leak rarely means the original repair failed — it usually means the full picture was never uncovered. This guide walks you through the systematic triage we use at Fixiz to diagnose intermittent leaks once and for all.
Why a “successful” repair doesn’t always mean the leak is fixed
Intermittent leaks are among the most frustrating problems in UK flats. A plumber spots a weeping copper joint behind the bath panel, replaces it, and everything looks dry for a fortnight. Then the damp returns. We see this regularly: a ground-floor flat owner fixes a leaking pipe joint, watches the walls dry out, and discovers moisture creeping back weeks later — left wondering whether the pipe was only part of the problem or whether a DPC failure was at play all along.
The reason is straightforward: damp in a flat rarely comes from a single source. A leaking pipe might coincide with penetrating damp, condensation on a cold wall, or water tracking from a communal riser above. Fix one source and the rest carry on unchecked. We dealt with a flat in south London where the owner had three repairs before anyone mapped the moisture properly. The actual cause was two overlapping issues: a slow weep from a heating return under the floor and rainwater entering through cracked render. Together they kept the wall permanently damp and the homeowner paying for one failed repair after another. It is a frustratingly common pattern in blocks and conversions right across London.
This is precisely why we always tell flat owners to resist rebooking the same plumber for the same repair. A returning leak demands a broader investigation that considers the entire building, not just the pipe that was last replaced. Until every moisture pathway is confirmed or ruled out, the damp keeps coming back.
Tip: If your walls dried out briefly after the repair but the damp returned, that temporary improvement is useful evidence — it tells your next investigator that the repaired fault was real but not the only source of moisture.
Step-by-step leak and damp triage — plumbing checks vs building envelope
When a leak keeps returning after repair, the key is structured elimination rather than guesswork. We split every investigation into two tracks: internal plumbing and the external building envelope.
Track one — internal plumbing
- Visual inspection behind panels: Remove bath panels, pedestals, and any boxing around pipework. Look for green staining on copper joints, white deposits on compression fittings, and dampness on pipe clips.
- Stop-tap isolation test: Turn off the mains supply and note the meter reading. Leave it off for two to four hours — if the meter moves, water is escaping from supply pipework.
- Central heating pressure check: Note the boiler pressure gauge before the system fires. A slow drop over several days suggests a leak on the heating circuit, separate from your water supply.
- Waste and overflow checks: Run each basin, bath, and shower individually while someone watches for drips. Silicone seals degrade over time, and water can track along waste pipes before dripping some distance away.
Track two — external building envelope
- External wall survey: Look for cracked render, crumbling mortar joints, damaged pointing around windows, and blocked gutters. Even small defects let driven rain penetrate solid masonry.
- Ground level and DPC check: If ground has been raised by a patio, path, or flower bed, it may bridge the damp-proof course. Earth or paving above the DPC line lets moisture bypass it, producing damp that looks identical to a plumbing leak.
- Gutters and downpipes: A partially blocked gutter overflows during heavy rain, saturating the wall beneath. This creates intermittent damp that takes days to show internally — easy to confuse with a plumbing fault.
We always run both tracks before conclusions. Roughly one in three cases involves both plumbing and the building envelope working together.
Moisture mapping and “rule out” testing — the diagnostic toolkit
When visual checks do not pinpoint the problem, professional tools gather hard evidence without ripping out walls.
Pressure testing
A pressure test confirms or rules out a plumbing leak. The plumber isolates pipework, pressurises it above normal operating pressure, and monitors the gauge. If pressure holds for fifteen to thirty minutes, that section is sound; if it drops, there is a leak. It confirms whether a leak exists — invaluable for separating plumbing from damp.
Tracer dyes
Fluorescent tracer dyes are added to water in a pipe run. Using a UV lamp, the investigator traces where the dyed water emerges — even in tiny quantities invisible to the naked eye. Different dyes go on different circuits: the bath waste gets one colour, the shower tray seal gets another. We have used this in several flats where two waste connections were both contributing water — something a visual check would never catch.
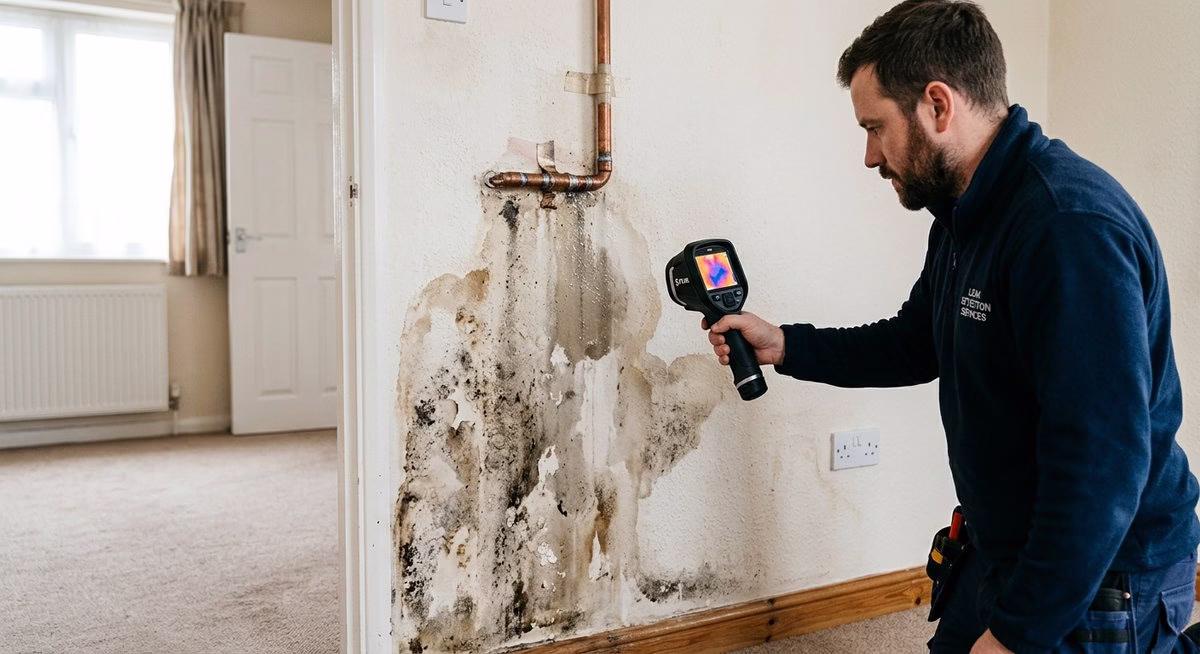
Thermal imaging
Thermal imaging cameras detect temperature differences in walls, floors, and ceilings. A hot-water leak creates a warm signature; cold-water leaks and rainwater create cool patches. A thermal survey highlights hidden dampness across a room without touching the building fabric.
Moisture meters and moisture mapping
A moisture meter reads how damp a material is. By taking readings in a grid, a specialist builds a moisture map showing where levels are highest and where dampness is spreading. Repeated mapping reveals whether damp is growing or shrinking after repair. Salts analysis adds another layer: nitrates suggest ground-sourced water, chlorides point toward mains supply, and sulphates indicate heating-system water.
Tip: Ask any leak detection specialist what methodology they will use before you book. If the answer is limited to “I’ll have a look with a moisture meter,” you need someone with a broader toolkit.
When a damp survey gets it wrong — and how to get better evidence
Not all damp surveys are equal, and a misdiagnosis sends you down an expensive dead end. The classic mistake is attributing low-level damp to rising damp based solely on moisture-meter readings at skirting height. Independent surveyors regularly find that what was called rising damp is actually penetrating damp from external defects, condensation on cold surfaces, or even residual moisture from an old leak. When dealing with a returning leak, an inaccurate survey only adds cost and delay.
We reviewed a case where a homeowner was told they had rising damp needing chemical DPC injection. The independent re-survey found readings were localised rather than uniform — inconsistent with capillary rise — and defective external pointing was the real culprit. That injection would have cost thousands and solved nothing.
To avoid a similar outcome, look for these red flags in any damp report:
- No external inspection: If the surveyor never went outside to check walls, gutters, and ground levels, their diagnosis is incomplete.
- Moisture meter readings only: A meter reading tells you a wall is damp — not why. Readings must be interpreted alongside external checks and the overall dampness pattern.
- Single-cause conclusion: Real-world damp often involves overlapping factors. A report naming one cause without considering alternatives should be questioned.
- Surveyor sells the treatment: If the person diagnosing the problem also profits from selling the remedy, there is a conflict of interest. Seek an independent surveyor who charges for diagnosis alone.
Tip: Instruct a surveyor who is a member of RICS or the Property Care Association and who has no financial interest in the remedial work. Their report should describe affected areas in plain language, explain the likely moisture mechanism, and set out recommended actions with an indication of urgency.
Plan of action for flats — management company responsibilities and access
Dealing with a returning leak in a flat adds complexity that house owners do not face. The source of your damp may lie in a communal area, inside a neighbouring flat, or within the building’s structure — all outside your direct control. Understanding responsibilities can save months of frustration.
Who is responsible for what
- Leaseholder: You are typically responsible for pipes, appliances, and fittings serving your flat alone — even if part of the pipe runs outside your demised area.
- Freeholder or management company: They are responsible for communal pipes, shared water tanks, the building structure, roof, and external walls. A leak caused by a structural defect falls to them to investigate and repair.
- Your lease: Leases vary, so check the wording carefully. The Leasehold Advisory Service recommends a professional assessment from a RICS surveyor to establish the cause before arguing over who pays.
Getting access and forcing action
If you suspect the leak originates in a neighbouring flat or communal void, contact your managing agent immediately. Most leases give the managing agent power to require access to any flat for investigation purposes. If a neighbour is unresponsive, the agent can pursue access on your behalf and legally compel repairs.
We helped a client in Battersea who had been going back and forth with the management company for months. The breakthrough came when we provided a moisture map and thermal images showing damp tracked from a communal riser — making it the freeholder’s responsibility. Hard evidence transforms vague complaints into actionable repair orders.
Tip: Put every communication with your management company in writing — email rather than phone. If the situation escalates, a clear paper trail showing when you reported the problem and what response you received is invaluable.
Why intermittent leaks are often multiple overlapping sources
One of the most important things we tell clients dealing with a returning leak is this: intermittent damp that comes and goes is rarely caused by a single fault. In a typical UK flat, several moisture pathways can operate simultaneously, each adding its own contribution to the overall dampness. Fix one and the problem improves but does not vanish — you only achieve a fully dry wall when every source has been addressed. This is the concept most first-visit repairs miss, and it explains why the same damp patch keeps reappearing despite apparently competent work each time.
Common overlapping combinations we encounter include:
- Slow plumbing weep plus penetrating damp: A dripping compression joint keeps the wall chronically damp, while rainwater entering through failed pointing adds moisture in wet weather. The wall never dries because one source is constant and the other is seasonal.
- Condensation plus historic moisture: A previous leak was repaired, but the wall was replastered before it dried out. Trapped residual moisture combines with condensation on the cold wall surface, and mould returns within months.
- Communal pipe leak plus DPC bridging: A slow leak on a shared riser dampens the lower wall from inside, while a raised patio outside bridges the DPC and adds ground moisture from the exterior. Each source alone might be borderline — together they produce visible damp.
This is why a single-point repair so often disappoints. In one Fixiz job in Lewisham, we identified three separate contributors to damp in a bedroom wall — a weeping radiator valve, wind-driven rain through eroded mortar joints, and condensation from an unventilated wardrobe against the external wall. Each had been dismissed individually as minor, but resolving all three finally produced a dry surface for the first time in two years.
What to demand from your surveyor or plumber on the second visit
If you have already had one repair that did not hold, you are entitled to a far more thorough approach on the return visit. Do not settle for a repeat of the same cursory inspection that missed the real problem the first time around. Here is what to ask for — and what to push back on if it is not offered.
- A written methodology before work starts: Ask the investigator what tests they will carry out and what they are trying to rule out. If the plan is to “have another look,” find someone else.
- Pressure testing on all circuits: Insist that hot and cold supply, heating, and any underfloor pipework are pressure-tested — not just the section previously repaired.
- External envelope inspection: Even if the original diagnosis was plumbing, the return visit must include external walls, gutters, downpipes, and ground levels. A plumber may not do this — in which case, a building surveyor should.
- Moisture mapping with baseline readings: Demand readings taken on a grid, recorded, and provided in writing. These form the baseline against which post-repair drying can be measured.
- A clear report distinguishing findings from assumptions: The report should state which sources were confirmed, which were ruled out, and which remain uncertain. “Damp noted — recommend replastering” is not a diagnosis.
- Post-repair monitoring plan: Ask when the investigator will return for follow-up readings. A responsible professional will want to verify moisture levels are dropping over the following weeks, not simply walk away and hope for the best.
Tip: We make post-repair monitoring standard on every Fixiz leak investigation. It is the only way to give you genuine confidence that the problem is truly resolved — not just papered over for the third time.
Frequently asked questions
Why does my damp keep coming back after the plumber fixed the leak?
The plumbing leak was likely only one of several moisture sources. Penetrating damp, condensation, DPC bridging, or a second undetected pipe fault can all continue feeding moisture into the same area even after a competent repair.
How can I tell if damp is from a leak or from penetrating damp?
Plumbing leaks tend to produce constant damp regardless of weather, often near pipe routes. Penetrating damp worsens after rainfall and is usually found on external walls. If damp is worse after storms, the building envelope is the prime suspect; if steady rain or shine, look at the plumbing first.
Is my management company responsible for finding the leak in my flat?
If the source is within the building’s structure, communal pipework, roof, or external walls, the freeholder or management company is generally responsible. If it is within your flat’s own pipework, it falls to you. When the source is unknown, the managing agent should be your first contact.
What should I look for in a damp survey to avoid misdiagnosis?
Choose an independent RICS-registered surveyor with no financial interest in selling treatments. A credible survey includes an external inspection, moisture readings at multiple heights, and a clear explanation of the moisture mechanism. Be wary of any report diagnosing rising damp from meter readings alone.
How much does professional leak detection cost for a UK flat?
Expect £200 to £500. A basic thermal camera visit sits at the lower end; comprehensive investigation with pressure testing, tracer dyes, and moisture mapping costs more. Thorough investigation is almost always more economical than repeated patch-ups.
Ready to move from confusion to construction? Get in touch with Fixiz today for a no-pressure chat about your project and the fastest route to full compliance.