Physical address:
128 City Road, EC1V 2NX, London,UK
A shower that starts leaking a year after a refurbishment is one of the most frustrating problems in a home. You’ve paid for a new bathroom, everything looks finished—and then you notice staining on the ceiling below or damp patches near the doorway. Most homeowners immediately think “failed silicone” or “bad grout”, but in practice shower leaks often come from movement, tray support, or the waste connection. This guide covers how we investigate a shower leak properly, how to reduce damage fast, and how Fixiz installs showers so they don’t become repeat call-outs.
Where shower leaks usually come from—what we see most often
Water always follows the easiest path. A tiny gap can pull water through by capillary action, and if there’s movement in the tray or screen, even good silicone can fail. The key is to identify whether the leak is from the water supply, the waste, or water escaping the showering area and getting behind finishes.
Common causes include:
- Waste connection: a loose compression fitting, damaged seal, or poor access panel detail that allows slow leakage every time the shower runs.
- Tray movement: the tray wasn’t fully supported or the subfloor has movement, so the tray flexes and breaks the seal line over time.
- Incorrect sealing sequence: sealing the screen incorrectly, or sealing in a way that traps water inside the profile and forces it to find an exit behind tiles.
- Waterproofing failure: insufficient tanking or missed junctions around corners and penetrations, so water gets behind tile backer boards.
- Grout and tile cracks: grout is not waterproof. If waterproofing behind isn’t correct, water eventually finds its way through.
The reason this becomes messy is that the visible damp patch might be far from the actual leak point. Water can run along joists, pipes, and plasterboard before it shows.
Tip: Do not keep ‘testing’ by using the shower daily if you suspect a leak. Short-term convenience can multiply the repair scope.
Damage control—what to do in the first 24 hours
Before you start pulling tiles off, focus on minimising damage and collecting clues. A controlled approach can save you money.
- Stop using the shower: use another bathroom if possible, or use the shower briefly and only when you can observe below/adjacent areas.
- Dry the area: ventilate, run extraction, and use a dehumidifier if you have one. The goal is to slow deterioration and mould growth.
- Photograph the evidence: stains, wet patches, cracked grout, and any gaps. Photos help confirm whether the issue worsens after use.
- Check visible plumbing: if there’s an access panel, check for drips around the waste while someone runs water.
- Check screen seals: look for gaps where the screen meets the tray and wall. If there are obvious gaps, note them—but don’t assume they are the only issue.
At this stage, you’re building a map of symptoms. That map makes diagnosis faster when a professional attends.
Tip: If staining appears on the ceiling below, place a bucket and protect electrics. If any light fittings are affected, keep the circuit isolated until checked.
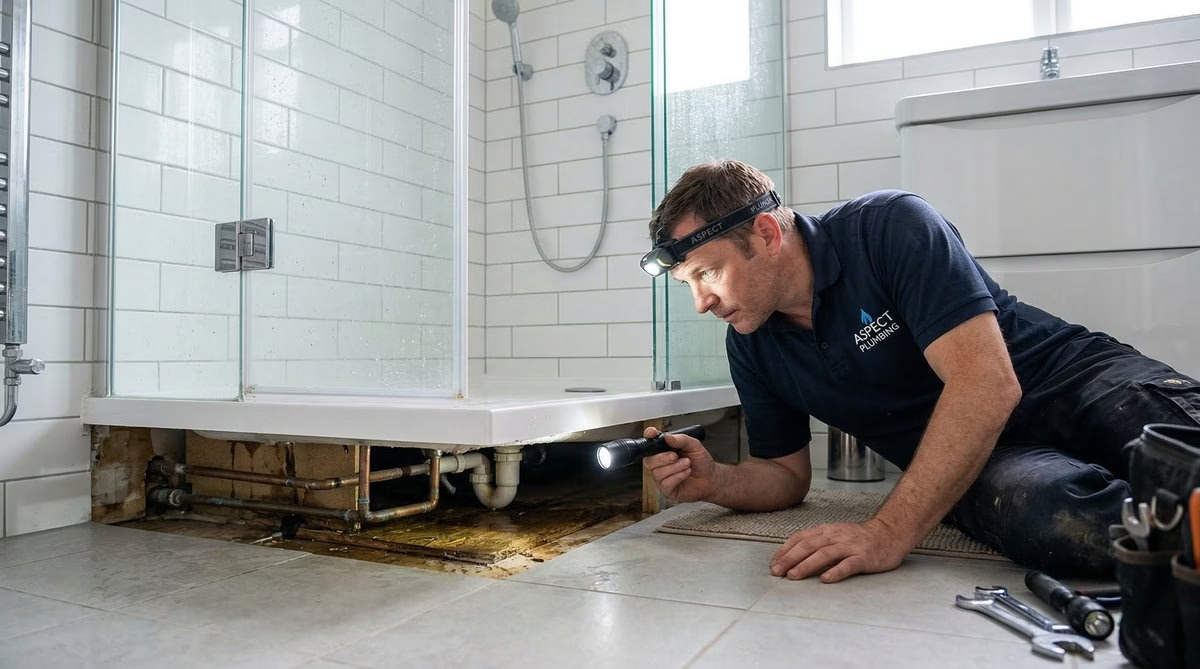
How we test and localise a shower leak—without unnecessary demolition
At Fixiz we try to avoid “rip it out and see” because it’s expensive and disruptive. Instead we isolate variables and test in a controlled way.
A typical investigation sequence is:
- Supply test: run the shower briefly while observing accessible pipework to rule in/out supply leaks.
- Drain test: run water straight into the waste (not sprayed onto walls) to see if the leak appears—this targets the waste and tray connection.
- Containment test: block the waste temporarily and fill the tray shallowly to see if the tray itself or waste seal is leaking.
- Spray test: direct water at specific junctions (screen-to-wall, wall-to-tray, corners) to see which area triggers moisture.
- Movement check: carefully check for tray flex or movement in the screen fixings, which often explains ‘it was fine for months’ leaks.
Once we know the most likely pathway, we can decide whether the fix is a reseal, a waste replacement, adding proper access, or a partial strip-back to correct waterproofing.
The correct sequencing for shower installs—so leaks don’t return
Leaks often come from sequencing mistakes. Shower installations are systems: tray support, waterproofing, screen, and sealing must work together.
We focus on the fundamentals:
- Solid base: the tray must be fully supported and level, so it doesn’t flex when stepped on.
- Waterproofing: correct tanking at junctions and around penetrations, especially in wet zones.
- Access: sensible access to the waste so future maintenance doesn’t require tile removal.
- Sealing approach: we seal the right joints at the right time so water is directed back into the tray, not trapped behind finishes.
Tip: If you’re planning a bathroom renovation, insist on knowing what waterproofing system is being used. “We’ll tile it well” is not a waterproofing plan.
How Fixiz helps—bathrooms built to last
Fixiz delivers bathroom works across London with proper sequencing, clean detailing, and realistic maintenance access. Our goal is simple: you should be able to shower without worrying about what’s happening behind the tiles.
When we repair or install showers, we prioritise:
- Diagnosis first: we don’t sell a reseal if the waste is leaking or the tray is moving.
- Minimum necessary opening up: targeted access rather than ripping out a whole bathroom.
- Correct rebuild: if waterproofing is the root cause, we rebuild the affected area properly so it doesn’t come back.
- Clear aftercare: we explain what to monitor and how to maintain seals over time.
FAQ—shower tray leaks
Is grout waterproof?
No. Grout is not a waterproof barrier. The waterproofing layer behind tiles is what prevents damage. Grout defects often reveal a deeper waterproofing problem.
Can I just add more silicone?
Sometimes a reseal is appropriate, but adding silicone over old silicone rarely works. More importantly, if the tray moves or the waste leaks, resealing won’t solve it.
Why did it leak only after a year?
Movement, settlement, and repeated wet/dry cycles can slowly break weak points. A marginal installation can look fine initially, then fail once seals fatigue.
Ready to move from confusion to construction? Get in touch with Fixiz today for a no-pressure chat about your leaking shower, the quickest way to pinpoint the cause, and the most cost-effective repair that actually lasts.